Spray painting - basics
The paint mixture must be prepared as directed by the manufacture, with the correct thinners and activators in the correct amounts. Final filtering of the mixture as it is put in the spraygun is recommended using disposable paper filters.
If you are new to spraying, regardless of whether the paint is to be applied with an aerosol or a spraygun, practice on some other surface before putting paint on carefully prepared panels. Everybody will get runs, sags, stripes and dry spots at first until they get the basic skills required. This applies to professional spray equipment as well, which just gives you the ability to paint bigger areas badly!
Spraying solid colours - panels and resprays

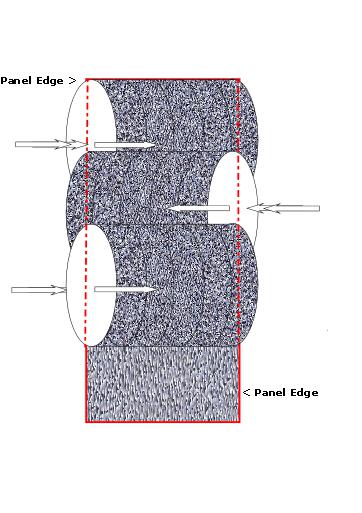
Overlap spraygun strokes evenly
Spraying solid colours - avoiding dry patches and overspray
If a full panel is to be painted, start at the top edge applying paint in evenly spaced strokes from one side of the panel to the other without pausing. The next stroke is taken immediately in the opposite direction, overlapping the first just sufficiently so that there is no "dry spray" gap left between the two. The amount of overlap will depend on your spray equipment , the more powerful types covering larger areas with each stroke whilst allowing smaller overlaps.
Complete the full panel in this way from top to bottom. If painting a horizontal panel, e.g. a bonnet , start at one side working in to the middle, then from the middle outwards to the opposite side, moving around the car as needed. By not stopping or starting mid-panel, dry joins or unabsorbed overspray can be avoided. Occasionally it may be easier to paint larger or awkward panels in sections. In this case the strategy would be to always spray a section immediately adjacent to one which has just been sprayed, trying to avoid overlaps drying out too much between coats as above.
Where more than one panel is being sprayed, decide which panel to spray first and follow into the next, and so on, until all panels have been painted. If, suppose, one full side of a car is to be painted, start at the rear wing, then doors, then finally front wing.
A full respray would normally start at, say, the nearside pillars progressing to the middle of the roof, continuing on the other side from the middle of the roof down to the offside pillars, followed by your chosen direction around the bottom half of the car from the rear wing in a complete circuit. This would be repeated for each subsequent coat, allowing time for solvent flash-off between coats.
In all the above, the intention is to prevent any direct spray from the gun falling onto panels which have dried too much to absorb the overspray. With a little forethought dry patches can usually be avoided altogether, or kept in places that are small and hence need minimal polishing. The correct grade of thinners and activators is important. Fast thinners etc. will be ideal for a single panel on a cold day, but will make a respray barely possible. On the other hand, using a slow thinner or activator on a cold day may produce runs or sags easily. Balance the speed of thinners and activators with the repair in hand, or take advice from your paint supplier.
-

