Bolted body panels have become increasingly common over recent years, with many vehicles now using bolted front wings, front panel assemblies, bonnet slam panels and bumper bar supports. Obviously accident damage on such cars is much easier to repair, allowing simpler removal/refit of panels, and also easier preparation and painting in some cases. Panels can be prepared, primed and painted "off-the-car" if a good colour match is possible.
A close visual inspection usually shows exactly where a particular panel is bolted. Some preliminary dismantling is usually required, as fastenings may be hidden behind wheel-arch liners , bumper bars or interior trim, or possibly accessed through a hole or blanking plate. A little bit of investigation will almost certainly reveal all. Headlamps, indicators or other pieces of trim or hardware can all conceal that one last bolt. Bolts or screws on lower edges or the underside of panels may have been concealed with anti-chip coating sprayed on after assembly.
Once all the bolts/screws are located and removed, a reasonable amount of pressure may be needed to dislodge the panel due to seam sealants which are usually applied along panel joints. Occasionally, some part of the panel may be firmly fixed with adhesive, e.g., Peugeot 205 front wings, requiring considerable force. If in doubt check for missed fastenings.
Preparing and refitting bolted panels
Replacement panels can be prepared and primed off the car. If a good match is guaranteed, painting can be carried out as well, but extra care is needed when fitting a painted panel. If painting is to be done with the panel fitted, it is a good idea to paint all panel edges before fitting.
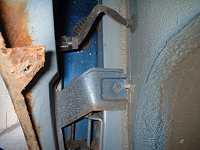
Any holes that need to be drilled, for example aerial holes or indicators, should be drilled before priming and painting begins. It is also easier to rustproof the panel thoroughly before it is fitted to the car, as in the picture below.
Refitting is simply a reversal of the dismantling sequence, reapplying seam sealers where needed. Leave all bolts finger tight until panel/door/bonnet gaps have been checked and are correct. Recheck gaps again when bolts are tightened
If replacing doors with bolt-on hinges, check that any shims which were present on removal are refitted in their relevant positions. A bead of seam sealer may also be required around hinges to prevent water leaking into the car interior through door pillars.